
In an on-premise environment you have your WSUS Server, which takes care of all the updates for your servers. since Microsoft is shifting its portfolio to the cloud, they had to shift their Update services to.
The patching of servers was integrated into the IaaS-service “Automation Account”, but now it’s called Azure Automation Update Management. It used to be named Update management, but they changed it when they launched “Azure Update Management”. I know, it’s confusing…
It has a lot of cool features, like no on-boarding, Azure Policy support, more control over access and roles, and more flexibility.
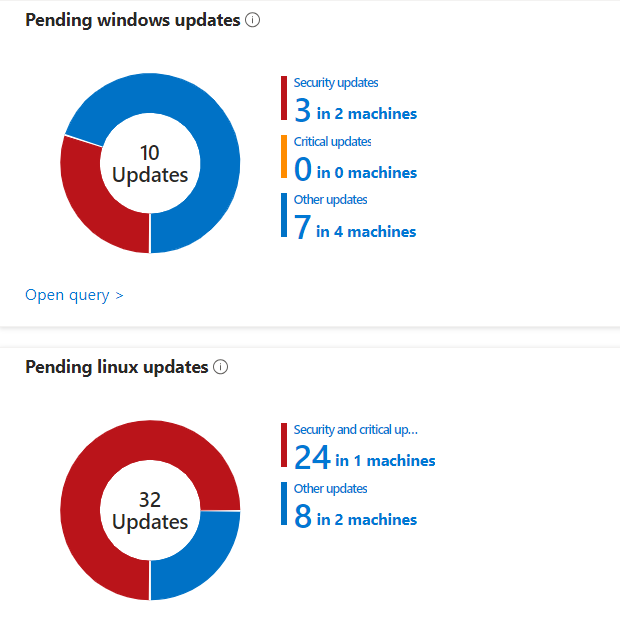
One of the benefits of Azure Update Manager can handle updates for Windows and Linux OS, whether they are in Azure, on-prem, or in another cloud. You can see how your Windows and Linux machines are doing with updates from one dashboard, and either update them right away or schedule them for later.
To do this ion other clouds or OnPrem, you need to use Azure Arc, which is a service that lets you extend Azure management and services to any infrastructure. Azure Arc allows you to connect, organize, and govern your hybrid environment from a single place.

Azure Arc enables you to use Azure Update Manager for Windows and Linux servers that are outside of Azure. You can onboard these servers by installing the Azure Connected Machine agent on them. This agent registers the server as an Azure resource and establishes a secure connection with Azure. Once the server is connected, you can assign it to Azure Update Manager and configure the update settings as described above. You can also use Azure Policy to enforce compliance and security across your hybrid environment.
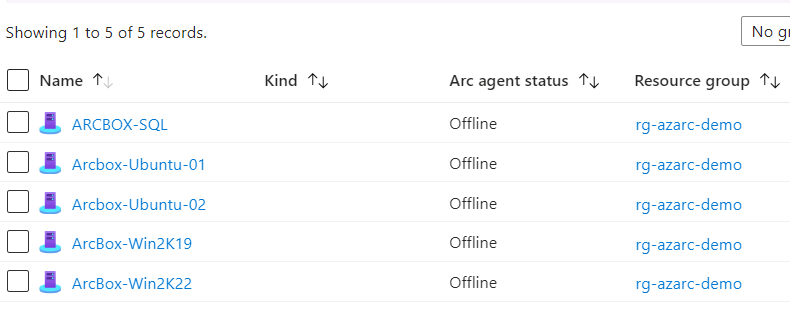
Azure Arc and Update Manager work together to simplify and streamline the patching process for your servers, regardless of where they are located. You can monitor and manage your updates from one dashboard and get consistent visibility and control over your hybrid infrastructure. You can also leverage Azure’s cloud capabilities and services for your on-premises or other cloud servers, such as backup, disaster recovery, and monitoring. With Azure Arc and Update Manager, you can reduce the complexity and cost of managing your servers and improve their security and performance.

How much does it cost?
Like everything in Azure, you have to pay for this service. “Azure Update Manager costs $0.162/server/day. If you use Azure Arc to connect a machine, you only pay for the days that it’s connected and managed by Azure Update Manager.”
How do you set it up?
Setting up Azure Update Manager is pretty easy. You just need to do two things: turn on periodic assessments and set up a maintenance configuration.
To add an Azure VM to Azure Update Manager, you need to turn on periodic assessment. You can do this from the VM menu or from Azure Update Manager. If you don’t turn on periodic assessment, you can’t use this option under the VM updates menu.

To turn on periodic assessment, click on “Update settings”.
Then a new window will open. Here, you need to turn on periodic assessment and choose “customer managed schedules” for patch orchestration. You can set up a custom maintenance window later.

After turning on periodic assessment, you need to set up a custom maintenance window. You can do this from the VM menu or from Azure Update Manager. In this example, I’m only setting up a maintenance window for one VM. You can apply the same thing to other VMs later.
As usual, you need to fill in some details like subscription, resource group, etc. to create a maintenance configuration. You also need to set up the maintenance scope, reboot settings, and the schedule of the window. This means choosing which resources you want to update, how the VM should reboot, and when the window should happen. In this example, I set up a maintenance window for a guest scope, and the reboots will happen if needed. The window is scheduled for every second Tuesday of the month at 10 PM. The window will last for 3 hours and 55 minutes (that’s the longest you can make it).
To apply the maintenance configuration, you can either do dynamic or direct assignments to resources. Dynamic assignment only works on the subscription level. So, I suggest doing direct assignment to the VMs.
In the Updates tab, you can pick which types of updates you want to install. You can even include or exclude specific KB IDs. By default, only Critical updates and Security updates are installed for Windows systems. I suggest that you also turn on these categories: Update rollups, Feature packs, Service packs, Definition updates (depending on the system and use case). This way, you get all the “important” updates automatically, like Defender updates.

Then, you can check which VMs have the maintenance configuration assigned. Go to Azure Update Manager -> Machines. In the “associated schedules” column, you can see the schedules for each VM.
Alerts
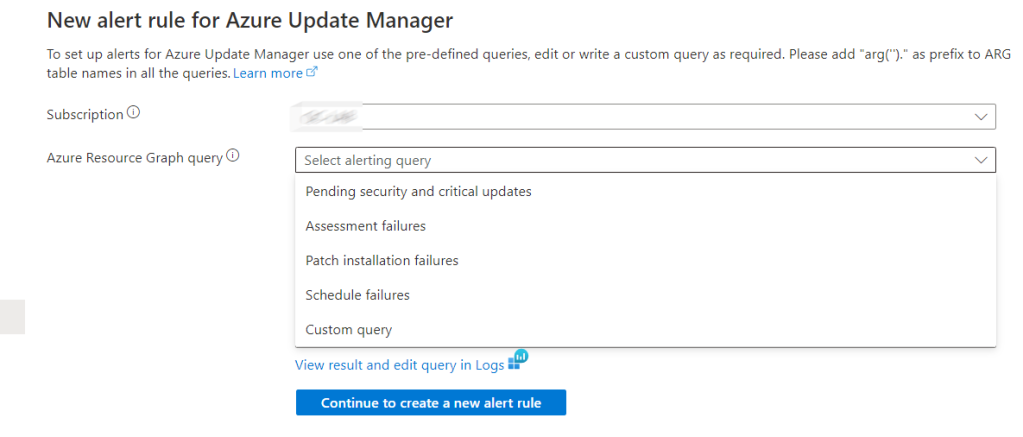
You can also set up alerts for different Azure Update Manager metrics. This is still in preview right now. The alerts are based on the Azure Monitor (alert rules and action groups). I think it’s a good idea to set up alerts, especially if updates or maintenance windows fail. You can create the alert rules from the Azure Update Manager menu, under the “Monitoring” section on the left side.
As you can see, Azure Update Manager and Azure Arc provide a powerful solution for managing updates for servers, whether they are in Azure, on-premises, or in another cloud. With these tools, you can monitor and manage updates from one dashboard, and get consistent visibility and control over your hybrid infrastructure. You can also leverage Azure’s cloud capabilities and services for your on-premises or other cloud servers, such as backup, disaster recovery, and monitoring. This simplifies and streamlines the patching process, reduces complexity and cost, and improves security and performance


Leave a comment